
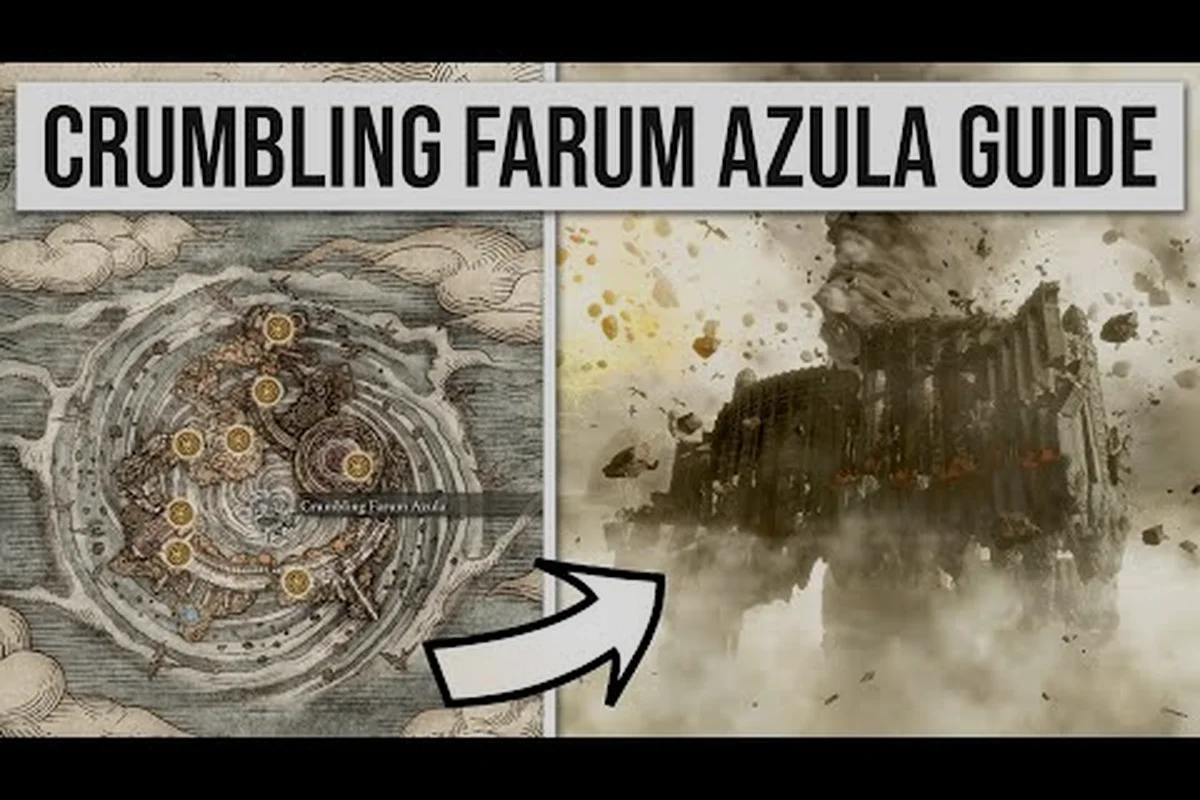
Crumbling Farum Azula is the endgame sky temple in ELDEN RING Tarnished Edition where you face Maliketh, the Black Blade, and can challenge the optional Dragonlord Placidusax. This floating ruin complex is the final mandatory area before the endgame boss gauntlet, so knowing every Site of Grace and shortcut here determines whether you finish the journey or get stuck farming runes for hours. The area is a sky temple with strong enemies and precise platforming, which makes preparation just as important as execution. For more detail, see the secret dungeons hidden in the endgame, covered in our related guide.
The official Bandai Namco page for ELDEN RING Tarnished Edition confirms that Crumbling Farum Azula holds the last Golden Seed and Sacred Tear for flask upgrades, meaning you cannot fully max your healing before the final fights without completing this zone. Since the area is accessed after the Mountaintops via the Forge of the Giants, you need to wrap up several earlier regions first. This guide covers the full route through the temple, every Site of Grace location, the Dragonlord Placidusax optional fight, and the best strategies for dealing with the notoriously aggressive Beastmen and Dragonkin that patrol the ruins.
Crumbling Farum Azula Access Requirements and Route Overview
Before you can step into the sky temple, you must complete a chain of mandatory bosses across multiple regions. The path starts in the Mountaintops of the Giants and requires the Forge of the Giants activation, which triggers a cutscene that transports you to Crumbling Farum Azula. According to community reports, players who skip the Fire Giant fight cannot progress, so this is a hard gate that requires both the Rold Medallion and the Flame of Ruin to be obtained.
The access sequence follows a strict order that most players complete between level 110 and 130, though the area itself can be tackled earlier if you are confident in your build. Here is the full route breakdown:
-
Complete the Mountaintops of the Giants main path and defeat the Fire Giant boss.
-
Light the flame at the Forge of the Giants and watch the cutscene that transports you to the temple.
-
Arrive at the Crumbling Beast Grave Site of Grace, which is your first checkpoint in the zone.
-
Work through the temple interior, past the Godskin Duo boss fight, and up to the Maliketh arena.
-
After defeating Maliketh, you unlock the final area of the game and can return to the Leyndell, Ashen Capital.
The area itself is a vertical maze with multiple levels, and the Dragonlord Placidusax optional boss is hidden in a separate arena that requires you to lie down in a specific spot. Because the temple is a sky structure, falling off the edge means instant death, and the platforming sections demand careful camera control. The Tempest-Swept areas are particularly dangerous because tornadoes can knock you off ledges, so equipping the Twiggy Cracked Tear in your Flask of Wondrous Physick can save you from losing runes on a bad jump.
All Sites of Grace Locations in the Sky Temple
The elden ring sites of grace locations in Crumbling Farum Azula follow a linear progression with a few branching paths, and knowing each one helps you plan your exploration without backtracking through dangerous enemy clusters. There are five total Sites of Grace in this zone, and each one serves as a respawn point for a specific section of the temple.
| Site of Grace | Location Context | Nearby Points of Interest |
|---|---|---|
| Crumbling Beast Grave | Starting point after the Forge cutscene | First Beastman patrol, dragon encounter |
| Crumbling Beast Grave Depths | Lower level after the first elevator | Dragonkin Soldier mini-boss, ladder shortcut |
| Tempest-Facing Balcony | Mid-temple balcony overlooking the storm | Path to Godskin Duo, Bolt of Gransax pickup |
| Dragon Temple | Large hall with dragon statues | Godskin Duo boss door, Ancient Dragon Smithing Stone |
| Dragon Temple Altar | Final grace before Maliketh | Maliketh, the Black Blade boss arena, shortcut to Placidusax |
The Dragon Temple Altar grace is the most important one because it sits directly before the Maliketh fight and also provides the fastest route to the Dragonlord Placidusax arena. When you rest at this grace, you can run back to the platform where you first arrived and lie down in the crouching position to trigger the optional boss fight. Community testing confirms that this interaction is easy to miss because there is no visual indicator, so many players complete the entire game without discovering the Dragonlord.
The Crumbling Beast Grave Depths grace is easy to overlook because it requires dropping down a series of platforms after the first elevator. The reward for finding it is a Somber Ancient Dragon Smithing Stone and access to the Dragonkin Soldier fight, which drops the Dragon Greatclaw incantation. Since this is one of the few areas where you can get a fully upgraded weapon before the final boss, the detour is worth the risk.
Dragonlord Placidusax Optional Boss Strategy
Dragonlord Placidusax's Phase 2 Lightning Strike Dodge Window
Dragonlord Placidusax's Phase 2 introduces a devastating lightning strike that covers roughly 60% of the arena floor, requiring precise timing to dodge. The attack begins with a distinct roar followed by a 1.5-second wind-up before the lightning descends. To avoid it, sprint toward the boss's rear-left flank rather than rolling, as the lightning's hitbox extends wider than the visual effect suggests. Players with less than 1,800 HP will be one-shot by this attack even at 60% damage negation, so consider equipping the Boltdrake Talisman +2 and consuming a Lightningproof Dried Liver before engaging Phase 2.
Beast Clergyman's Aggro Reset and the Pillar Looping Strategy
The Beast Clergyman phase of the Maliketh fight can be trivialized by using the four broken pillars scattered across the arena. When you circle a pillar while maintaining a distance of 8-10 meters, the Beast Clergyman will repeatedly throw his dagger attack, which gets blocked by the pillar geometry. This creates a safe window to heal or apply buffs like Flame, Grant Me Strength. However, this strategy fails if you attack during his recovery animation, as he will leap over the pillar and close distance instantly. Players using this method typically complete the first phase without taking damage, reserving all Crimson Tears for Maliketh's aggressive Phase 2 moveset.
The Dragonlord Placidusax is one of the most spectacular optional bosses in ELDEN RING Tarnished Edition, and reaching him requires a specific interaction that many players never discover. After resting at the Dragon Temple Altar grace, you need to backtrack to the large open platform where you first entered the temple and look for a prompt to lie down. This action transports you to a separate arena in the storm clouds, where the two-headed dragon awaits.
The fight itself is a test of positioning and patience because Placidusax has several attacks that cover the entire arena. His lightning breath attack fires a wide beam that tracks your movement, while his claw swipes create shockwaves that can stagger you even when you are behind him. The key to this fight is staying close to his hind legs and attacking during the recovery frames after his combos, which are longer than they appear because the dragon telegraphs each swing with a visible wind-up.
| Placidusax Attack | Dodge Timing | Recommended Counter |
|---|---|---|
| Lightning Breath Beam | Roll sideways when the head lowers | Close distance during the wind-up |
| Double Claw Swipe | Roll into the second swipe | Punish with jump attacks |
| Thundercloud Dive | Run perpendicular to the dive path | Use Flame, Grant Me Strength before the dive |
| AoE Lightning Burst | Jump or roll at the flash | Back away and heal during the recovery |
The fight has a phase transition at about 50% health when Placidusax becomes enraged and starts flying more frequently. During this phase, he summons lightning strikes around the arena that create lingering damage zones, so you need to keep moving and avoid standing in the glowing patches. The Mimic Tear spirit ash is particularly effective here because it can draw aggro while you focus on the tail, which is the safest weak point since the dragon cannot hit behind itself easily.
According to player reports, the Dragonlord Placidusax drops the Remembrance of the Dragonlord, which can be exchanged for either the Placidusax's Ruin incantation or the Dragon King's Cragblade weapon. The incantation is a massive lightning breath attack that deals heavy damage to large enemies, while the cragblade is a curved sword with a unique weapon skill that summons lightning bolts. Both options are viable, but the incantation is generally preferred for faith builds because it scales with your incantation scaling stat.
Maliketh the Black Blade Boss Fight Breakdown
Maliketh, the Black Blade is the mandatory boss at the end of Crumbling Farum Azula, and his fight is one of the most challenging in the entire game because of his aggressive moveset and the Destined Death mechanic that reduces your maximum HP. The fight has two phases, and the second phase is significantly harder because Maliketh becomes faster and more unpredictable with his Black Blade attacks that leave a lingering damage-over-time effect.
The first phase pits you against the Beast Clergyman, a smaller version of Maliketh that uses quick claw swipes and a rock throw attack that can be dodged by rolling sideways. This phase is relatively straightforward because the Beast Clergyman has low poise and can be staggered with heavy weapons, but you should conserve your flasks because the second phase is where most players die. The Blasphemous Claw item, which you can obtain from the Recusant Bernahl questline, allows you to parry Maliketh's golden sword attacks during the second phase, creating a massive opening for critical hits.
| Maliketh Attack | Phase | Counter Strategy |
|---|---|---|
| Beast Clergyman Claw Combo | Phase 1 | Roll backward and punish the final swipe |
| Rock Throw | Phase 1 | Roll sideways as the rocks land |
| Black Blade Spin | Phase 2 | Use Blasphemous Claw to parry |
| Destined Death Slash | Phase 2 | Roll into the attack and heal immediately |
The second phase begins when Maliketh transforms and becomes much more aggressive, leaping across the arena and slashing with his Black Blade that leaves a black flame trail. The Destined Death effect reduces your maximum HP by a percentage each time you get hit, which means you cannot afford to trade blows. The best strategy is to stay close and bait his jump attack, which has a long recovery animation that allows you to land several hits before he recovers.
For melee builds, the Bloodhound's Step weapon art is extremely effective because it lets you dodge through Maliketh's combos without taking damage. For ranged builds, the Comet Azur sorcery can melt Maliketh's health bar if you time it during his transformation cutscene, but you need to be careful because he can close the distance quickly. The Black Knife Tiche spirit ash is the best summon for this fight because she has high mobility and can dodge Maliketh's attacks while applying black flame damage over time.
Early Game Preparation and Recommended Builds
Golden Seed and Sacred Tear Count in Crumbling Farum Azula
Crumbling Farum Azula is the only region in the game that houses both the final Golden Seed and the final Sacred Tear for flask upgrades. The Golden Seed is found on a corpse near the Beside the Great Bridge Site of Grace, while the Sacred Tear is located in the church structure past the Dragon Temple Lift. Collecting both here brings your Flask of Wondrous Physick to its maximum of 14 charges and your Sacred Flask to +12. Missing these two items before defeating Maliketh locks you out of them until New Game Plus, as the area becomes inaccessible after the final boss sequence. Missing these two items before defeating Maliketh locks you out of them until New Game Plus, as the area becomes inaccessible after the final boss sequence, so if you're still exploring the Lands Between before that point, our Elden Ring Map Fragment Locations guide can help you uncover every corner of the map to ensure you don't overlook other crucial pickups like these.
Maliketh's HP Threshold and the Blasphemous Claw Parry Window
Maliketh transitions to Phase 2 at exactly 50% HP, triggering a cutscene that resets his poise and allows for a free critical hit window. The Blasphemous Claw, obtained from Recusant Bernahl in Farum Azula, can parry Maliketh's golden blade attacks during a specific 0.8-second window when his sword glows yellow. Successfully parrying three times in Phase 2 staggers him for 5 seconds, enabling a fully charged heavy attack followed by a critical strike. This strategy reduces the fight duration by roughly 40% compared to pure dodging, making the Claw essential for melee builds with less than 40 Vigor.
While Crumbling Farum Azula is an endgame area, your preparation starts much earlier in the game, and several regions you visit before the Mountaintops directly influence your success here. The elden ring weeping peninsula region in southern Limgrave contains the Church of Pilgrimage and the Tower of Return, which offer early game talismans and upgrade materials that remain useful in the endgame. The Misbegotten Warrior fight in the peninsula's Castle Morne drops the Grafted Blade Greatsword, which is a strong weapon for strength builds that can carry you through the entire game.
The elden ring mistwood area in eastern Limgrave is another early game zone that provides essential tools for the endgame. The Mistwood Ruins contain the Ancestral Follower NPC who teaches you the Finger Snap gesture, which is required to summon Blaidd for the Darriwil fight. More importantly, the Siofra River Well in the Mistwood connects to the elden ring underground map, which contains several optional bosses that drop Golden Seeds and Sacred Tears for flask upgrades. Since Crumbling Farum Azula holds the last Golden Seed and Sacred Tear, you need to collect every earlier one to max out your flasks before Maliketh.
The elden ring evergaols scattered across the map are also worth completing before the endgame because they reward you with Talisman Pouches that increase your talisman slots. The Limgrave Evergaol contains the Bloodhound Knight Darriwil fight, which is a challenging early game encounter that teaches you the dodge timing you need for Maliketh. The Raya Lucaria Academy area also has an evergaol that contains the Magma Wyrm Makar, which drops the Moonveil katana, one of the best weapons for intelligence builds.
| Early Game Zone | Key Reward | Endgame Relevance |
|---|---|---|
| Weeping Peninsula | Grafted Blade Greatsword, Sacred Tear | Strength weapon for Maliketh |
| Mistwood | Blaidd summon, Siofra River access | Golden Seed collection |
| Limgrave Evergaols | Talisman Pouch | Extra talisman slot for endgame |
| Siofra River | Golden Seed, upgrade materials | Flask upgrades before Farum Azula |
The elden ring roundtable hold serves as your hub between regions, and the Twin Maiden Husks there sell upgrade materials that become available as you progress. Before entering Crumbling Farum Azula, you should purchase the Somber Smithing Stone upgrades from the Twin Maiden Husks to ensure your weapon is at least +9, because the enemies in the sky temple have significantly more HP than anything in the Mountaintops. The Smithing Master Hewg at the Roundtable Hold can also upgrade your weapon to +25 with the right materials, which is the maximum level for standard weapons.
Best Weapons and Spirit Ashes for the Sky Temple
Choosing the right weapon and spirit ash for Crumbling Farum Azula can make the difference between a smooth playthrough and hours of frustration. The temple's enemies are primarily Beastmen who are weak to strike damage and holy damage, while the Dragonkin enemies are weak to lightning damage. This means a weapon that deals multiple damage types is ideal, and the Blasphemous Blade from the Rykard boss fight is one of the best options because it deals fire damage and heals you on kills.
The Mimic Tear spirit ash remains the most versatile summon for this area because it copies your build and can tank hits while dealing damage. However, the Black Knife Tiche is arguably better for the Maliketh fight specifically because her black flame attacks reduce the boss's maximum HP, which stacks with the Destined Death mechanic. The Greatshield Soldiers spirit ash is also effective for the Godskin Duo fight because they can hold aggro while you focus on one boss at a time.
| Weapon | Damage Type | Best For |
|---|---|---|
| Blasphemous Blade | Fire + Physical | General crowd control, healing |
| Moonveil Katana | Magic + Physical | Intelligence builds, stance breaking |
| Rivers of Blood | Bleed + Physical | Godskin Duo, fast bosses |
| Starscourge Greatsword | Physical + Gravity | Strength builds, AoE attacks |
The Godskin Duo fight in the Dragon Temple is the main roadblock for most players because it requires you to fight two bosses simultaneously, and they can chain attacks that leave no room to heal. The Sleep Pots consumable is the most effective strategy here because both Godskin bosses are vulnerable to sleep, allowing you to put one to sleep while you focus on the other. According to community testing, the Mimic Tear with Sleep Pots equipped will also use them, which can trivialize the fight if you are lucky with the AI behavior.
Frequently Asked Questions
How do I reach Crumbling Farum Azula in ELDEN RING Tarnished Edition?
You must defeat the Fire Giant in the Mountaintops of the Giants and then activate the Forge of the Giants. This triggers a cutscene that transports you to the Crumbling Beast Grave Site of Grace, which is your first checkpoint in the sky temple. There is no alternative route into the area.
Can I return to earlier regions after entering Crumbling Farum Azula?
Yes, you can use the map to fast travel back to any previously discovered Site of Grace at any time. However, you cannot progress past the Maliketh fight until you complete the temple, and the final area of the game becomes locked after you defeat him, so finish any optional content first.
How do I unlock the Dragonlord Placidusax fight?
Rest at the Dragon Temple Altar Site of Grace, then backtrack to the large platform where you first entered the temple. Look for a prompt to lie down on the ground, which transports you to the Dragonlord's arena. This interaction has no visual indicator, so you may need to walk around the platform to find the trigger.
What level should I be for Crumbling Farum Azula?
Most players complete this area between level 110 and 130, with weapons upgraded to at least +9 for somber weapons or +22 for standard weapons. The enemies here hit hard and have high HP, so being underleveled makes the platforming sections especially punishing.
What is the best spirit ash for the Maliketh fight?
Black Knife Tiche is the top pick for Maliketh because her black flame attacks permanently reduce his max HP, and her high mobility lets her dodge his aggressive combos in both phases. Mimic Tear works if your build is strong, but it takes more damage by copying your positioning habits.